

Hi there! I just thought I'd show you the quick project I put together for my family for Valentine's Day. This is so quick and easy, you could literally make one today, right now!!! I know because I made the one for my hubby in less than two hours yesterday. My daughter walked in and saw it and said "Sure...you have time to make one for Dad...". I gave into the guilt (besides, it was fun! And made one for her and her brother as well.)
I have to give credit to my friend Julie who found a "52 things I love about you" deck on the website www.cutoutandkeep.net . Because it's what I do, I made mine a little more involved and "vintage-y". Still, It was so easy, I used mostly stuff I had on hand including the decks of cards, paint, paper, and ribbon. I made a quick run to purchase the binder rings (the 7 Gypsies ones are so much better than any other binder ring I've used, plus they're red...how cool is that?) While I was at the store, I bought the clear embellishments, but I wasn't even convinced these needed them. Once I got an assembly line going, these came together really fast.
This was such a fun, easy project, I even had time to photograph the process just in case you want to make one (or two!)
Step 1: find a deck of cards. Easy! If you're making this for Valentine's Day, the red ones look great. I had an old set of purple ones I found laying around and a deck of pink ones (they were breast cancer cards so of course I had to buy them.) But this would be cool with an old vintage set of cards, or even a mixture of different cards.
Step 2: Make your list of "52 things I love about you". This was super easy. I made a table in Microsoft Word (or Pages if you have a Mac). The table was four columns with four rows. Each cell measured 2.25" tall and 1.75" across. This was the perfect size to fit into the center of each card without covering up the numbers. I made the lines on the table dotted so I could use them as a cutting guide later. Then, I chose my font and started typing. Once I made the table for one person's deck, I just used the same table for the others, but changed the "I love you because..." sentiments. Here's a pic of the table printed onto computer paper. Once I checked for spelling mistakes, etc. I printed it onto cream colored cardstock.

I will point out that between printing the paper copy and printing onto cardstock, I changed my font. I liked the cursive with the typewriter font much better. After I printed the table on cardstock, I cut them apart. I chose to paint the edges. I just used regular acrylic paint in a variety of shades of pink and a foam brush. Here's a pic of that:


While I was painting the edges of the sentiments and letting them dry, I was also preparing the card bases. I decided to spray them with glimmer mist. I used the color sweet pea. Here's an example of that:

It doesn't really take long for the glimmer mist to dry, but you can speed up the process by using your heat gun. Just be careful and don't get too close to the cards or the heat will cause the coating on the cards to bubble. Once I had misted one side, I turned the cards over and did the other side until I had a deck that looked like this:

After the misting was done, I painted the edges of each card as well, usually with a different shade of pink to add interest. I felt like that really made each card look more like a finished page and added some "pop" to the colors.


I decided to matt each of my sentiments on some valentine papers just to add a little more color. So, I cut 12 x 12" paper strips that were 2.5" wide. Then I cut each of the strips into 2" pieces, getting 6 rectangles out of each strip. I used double sided paper so I cut another strip into 6 more pieces so I could have the other pattern as well. I found that nine strips of patterned paper made the exact number of rectangles since I included a dedication on the inside of the cover and an extra card that had a "52+" sentiment on it. If you want to make more than one deck at a time, just double or triple the number of strips as needed. Once I had all my rectangles cut, I adhered all of the sentiments onto the rectangles. (Things really start moving quickly at this point!)
I was a little anal and tried to keep my papers in some sort of sequence. Yes, even though I love to get messy, out of chaos comes order!

The obvious next step: adhere your sentiments onto the cards. Again, my anal side broke in and I tried to shuffle up the cards so the black faces were mixed in with the red ones, the numbers were random, and the last card was the King of Hearts. Forgive me!

After that was done, I used my Cropodile Big Bite to punch the holes. I like the Big Bite for this because it has a guide you can set so you punch the hole in the same place every time. And you can punch a bunch of pages at once. The Cropodile has this, too, but I find it easier to punch through a whole bunch of layers without having them slip around on the Big Bite since it's flat on the table. If you're wondering, I found it best to punch the holes after I'd done my layering so the sentiments could be smack in the middle of the cards. Alternatively, you could punch the holes in one card, line up a stack of other cards, trace the holes and punch them.

Next came the fun part! I made sure the pages were in order and put them on the rings. The reason I like the 7 Gypsies rings so much is that they lock tightly and don't let the pages get caught when turning them like other binder rings do. After I put them on the rings, I went back and sprinkled a few adhesive embellishments on various pages, and tied lengths of ribbon, yarn, fibers, etc. in colors that matched onto the top ring.
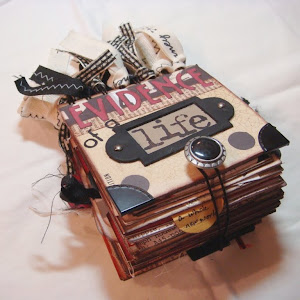
Here's just a few more photos of the finished products:

I really like the way each one turned out a little differently even though I used the same basic supplies for all of them.

It was a lot of fun to give them to everyone this morning and watch them read each card, as well as everybody else's. I am staggered that even my husband wondered aloud, "Hmmm...where am I going to keep this?" I almost fell over. He actually wants to display it somewhere!

Now that I've finished these, I have even more ideas. I think it would be great to use a bunch of vintage cards (which I have been collecting) and do a "52 things I always want to remember about..." or "52 things I learned" or "52 things I wish I wrote". The possibilities are really neverending. There are definitely more of these in my future. I can feel it!
I guess I will have to save the Valentine's Day for next year but I am thinking of something for a birthday that is coming up. A card for every year or something...I will probably just use your ideas though!!
ReplyDeleteThanks Alane and Happy Valentine's Day to you.
I love this idea! I will do it for an upcoming birthday of a loved one. And, is there any chance you could share your wonderful chocolate cake recipe? Sincerely, Maureen
ReplyDeleteAwesome idea but I hate you for it because my to do list was already long enough. However, I have to make one of these for Lauren before she goes to college. She'll think I'm a drok, but I can live with that.
ReplyDelete*dork. Make that a double dork.
ReplyDeleteHey there! I realize it has been a HUGE while since you've probably visited this page -- but I am in love with your creativity! Re-creating your "52 cards" project at the moment...wondering what you used to adhere the sentiments to the cards? Glue or double-stick tape?
ReplyDeleteHope this gets to you in time...and hope you are still just as arts and crafty!!
Oh! And what font did you use? It's really beautiful. =)
ReplyDeleteHello anonymous! Thanks for the interest! I used a glue glider (with double sided tape) to adhere all the pieces together.
ReplyDeleteThe font I used was a free one...I believe it was called Vintage Typewriter. Sadly, I lost it when I got a new computer. I have to see if I can find it and download it again! I have another good one called Traveling Typewriter that has a very similar look to it. There are so many great typewriter fonts out there, I am addicted to them!
Have fun! I haven't been as crafty lately, but you've inspired me to get to work making something for Valentine's Day, too! Thanks!
This comment has been removed by the author.
ReplyDeleteThank you so much for answering! I've been reading through your blog and you have amazing style =) I found that Word's typewriter font matches what your numbers look like, but I can't find anything like the cursive you used -- and THAT is what I'm dying to find! Let me know if you figure out how I can get it...I still have some time before I get to crafting ;)
ReplyDeleteHappy (almost) Valentine's Day! And yes, get inspired!
-- Jenny
Very cute Valentine's Day gift idea!!!
ReplyDelete