Thursday, July 31, 2008
Forgot to mention...
I posted the two Layouts at the top that were inspired by 2 of my 52 pick up technique cards. The cards can be seen when you scroll further down the page.
Where in the world is?....
Yes, I know, it seems like F-O-R-E-V-E-R since I updated my blog. Things have been pretty crazy around here!!! First Julie, Kim, Paula and I traveled to Chicago for CHA (That's the Craft and Hobby Trade Show for those of you who aren't "in the know"). We went there seeking donations for our Crop For A Cure to be held on Oct. 25 (Go to http://duluthcrop4acure.blogspot.com for more info or visit www.scrapbookroyalty.com to register.)
Anyway, we had TONS of FUN and met loads of great, amazing, generous people. I will post some pics and info about this later when I get my head on straighter. But wow! We saw some of the most mind-blowingly creative work than you can imagine! It was so hard to do what we came there for, visit all the vendors, and give them our 10 second spiel, and NOT linger in the booths touching all the new goodies, soaking in all the cool samples, and generally drooling. We did come home with loads of stuff and promises for more, but more on that on the Crop blog!
On our way home from Chicago we met up with my sister Sharon and her family who drove all the way from Pennsylvania to spend a week with us in Duluth. We had a GREAT time and kept them entertained. It was so awesome to see them, and so generous of them to make the long drive to come for a visit. We don't get many visitors, so it was a real treat. I was so sad when they left! Of course it didn't help that I got some nasty virus the last day they were here...I always blubber like a baby when I'm sick. ( But not when I'm really sick, like with cancer...then I'm stoic. Weird, huh?)
So on top of the mountains of laundry I have been doing, the unpacking, the pile of unopened donations that has swallowed my craft room and the endless list of tasks I need to get done, I have been fumbling around trying to keep up with my three BPS classes! I am really trying not to stress, though. I keep telling myself that I signed up for this for FUN and not to put pressure on myself. I keep humming that like a meditative mantra....fun...no stress...fun....it seems to be working. (Okay, I admit, not all the time.)
Anyway, I have some technique cards to share and some pages I've made. Enjoy. It's not much, but it's not too bad for someone who is time juggling like crazy!
Ta ta for now!
-Alane
Friday, July 11, 2008
Boredom and sadness...never a good combination!
You may be thinking, "Whoa! What's with the avalanche of creativity Alane's got going on? She's so productive!!!" It may seem that way on the surface, but if you dig a little deeper (and I've got the shovel!) you will see that it is really a coping mechanism. I can't believe that I didn't blog about this sooner (talk about denial) but Cory has now been across the world and completely unreachable for one whole week!!! That's right! He has traveled through the Duluth Sisters Cities exchange program to Ohara, Japan. He isn't coming back until the 13th and my veneer of denial and busy-ness is starting to crack. It's all I can do not to panic. He is staying with a Japanese family there. What is bothering me is we have had no contact from him. We had hoped that his host family would have email access so he could drop us a note every few days. Who'd have thought that many Japanese families don't have internet access? I don't even know if they have a computer. Weird. Thankfully one young woman who is also part of the exchange has sent a few emails and some photos. They aren't together every day, so she doesn't mention him but he shows up in the background in a few photos. So, it is somewhat comforting to know he's still alive! (Nervous chuckle.) He's 15 years old but he's still my baby!!! Of course my husband doesn't understand what I'm so worked up about. But, you Moms know how it is...I have kept him close his whole life and now I just let him go off on his own! It's double tough because he's my chatty kid, the one who's up for anything, always nearby, wanting a hug, or to talk. Man, he's left a hole! The only person that is feeling his absence as keenly (or more so) is Erin. I know she is as amazed and baffled by this as we are. Normally they live under a love/hate relationship. Since Erin is 16 and a girl, that leans towards hate and irritation most of the time! I couldn't believe it but she emailed all of her friends with the title "my brother's gone and I'm all alone!" And that was on Saturday! Her friends wrote back astounded that she was actually saying she missed him! It's so sweet. She gets on the computer everyday and looks at the photos the other girl is sending and searches for pics of Cory. Of course I've always known how strong their bond is, but it's really something to see her acknowledge it.
I promised that I would tell about the destruction that has been going on hear at Casa Davis. Well, as part of my Have More Fun class at Big Picture Scrapbooking, the teacher, Stacy Julian, has challenged those of us who want to participate in a crazy, no holds barred, let out your inner pre-schooler bonanza! There is this book called "Wreck This Journal" that is basically a black cover with white pages with directions to do something crazy and destructive to the journal on each page. Basically this is a giant exercise in letting go of perfectionism, working with no rules, playing and having fun all in the name of unleashing your primal creativity. It sounds like a lot to get from some paper and glue, doesn't it? To give you an idea, some of the page drections are things like: spit, dribble or spill your coffee here; climb someplace very high and drop the journal; bring the journal in the shower with you; tear out your favorite page and give it away; mail the journal to yourself. Well, the message board from my class is filling up with hilarious stories and photos from my my compatriots. One woman's kids were playing with the journal, dragging it behind their bikes when her dog, a giant Newfoundland, got it and chewed on it! I, of course, am hatching plans to coat mine in peanut butter and let the dogs have at it! After all, they need some kind of incentive! They don't work for peanuts! (No wait, actually they do.)Stacy, the teacher, showed pictures of her driving her scooter, dragging it behind her. Of course I could not wait to jump into the fray. Strangely, I have not found it at all difficult to let loose. Hmmm. I suppose their are a bunch of you going..."Yeah, like we couldn't see that one coming!" I have been told that I am (how does my friend Kim put it?) without filters? *You'd better comment and give me the right terminology, Kim!* So, I have been wrecking my journal by slapping paint all over it, sending pages through the wash, writing with my feet, etc. But the best was the other day when we were challenged to give the journal to someone else and let them poke holes in it with a pencil. Of course I gave it to Erin since she was so bored. She took her job very seriously and had a blast. I highly recommend this very weird kind of fun project for anyone who feels a little too tightly wound. No creativity is necessary, just bravery!
I promised that I would tell about the destruction that has been going on hear at Casa Davis. Well, as part of my Have More Fun class at Big Picture Scrapbooking, the teacher, Stacy Julian, has challenged those of us who want to participate in a crazy, no holds barred, let out your inner pre-schooler bonanza! There is this book called "Wreck This Journal" that is basically a black cover with white pages with directions to do something crazy and destructive to the journal on each page. Basically this is a giant exercise in letting go of perfectionism, working with no rules, playing and having fun all in the name of unleashing your primal creativity. It sounds like a lot to get from some paper and glue, doesn't it? To give you an idea, some of the page drections are things like: spit, dribble or spill your coffee here; climb someplace very high and drop the journal; bring the journal in the shower with you; tear out your favorite page and give it away; mail the journal to yourself. Well, the message board from my class is filling up with hilarious stories and photos from my my compatriots. One woman's kids were playing with the journal, dragging it behind their bikes when her dog, a giant Newfoundland, got it and chewed on it! I, of course, am hatching plans to coat mine in peanut butter and let the dogs have at it! After all, they need some kind of incentive! They don't work for peanuts! (No wait, actually they do.)Stacy, the teacher, showed pictures of her driving her scooter, dragging it behind her. Of course I could not wait to jump into the fray. Strangely, I have not found it at all difficult to let loose. Hmmm. I suppose their are a bunch of you going..."Yeah, like we couldn't see that one coming!" I have been told that I am (how does my friend Kim put it?) without filters? *You'd better comment and give me the right terminology, Kim!* So, I have been wrecking my journal by slapping paint all over it, sending pages through the wash, writing with my feet, etc. But the best was the other day when we were challenged to give the journal to someone else and let them poke holes in it with a pencil. Of course I gave it to Erin since she was so bored. She took her job very seriously and had a blast. I highly recommend this very weird kind of fun project for anyone who feels a little too tightly wound. No creativity is necessary, just bravery!
Thursday, July 10, 2008
More techniques and a productive Wednesday!
On Wednesday I worked like a fool to hammer out a bunch of projects for my classes at Big Picture Scrapbooking. In addition to 52 Pick Up I am taking a class called Have More Fun and Photography 101 which started today. I am excited about the Photog class to learn how to actually use my camera!!! It is embarrassing to have a powerful camera and pretty much keep it on the automatic setting. I am a little concerned that I have bitten off more than I can chew with these three classes, but so far I am managing to stay pretty much caught up.
So, I did the next 3 techniques for 52 pick up. I enjoy using paint, so I was thrilled that two of the techniques involved paint. Technique #11 was all about using painter's tape as a resist. I got busy and did so many layers of paint that I had to force myself to stop before Brad had to do an intervention. I used regular acrylic paint and some of the Tim Holtz crackle paint. I didn't have a plan when I started, so I just went with the flow. It was fun. I wanted to leave some chipboard exposed, but I did learn that lo-tac painters tape does stick a little too much to chipboard. Oh well. A little tearing never scared me!
Technique #12 was using glaze pens to doodle a design on top of paint. Basically these pens create a puffy, gel like raised line and can be used on all kinds of surfaces. I actually broke my own rule and did this technique twice. (I'm trying to learn to accept imperfection!) I had to do it twice, because my first try was on a black painted background which I liked better, but the glaze pens didn't show up on it. It was a bummer. They weren't as bright or opaque as I wanted. As it is I had to go over my lines multiple times to make them visible. I like the potential, but I'm not sure the result was as successful as I wanted.
Technique #13 involved embossing a stamped design onto cardstock and then removing the color from the cardstock with the application of bleach. I remember doing this in art school on fabric. It's a cool technique because the dyes disperse and leave different colors behind. You never really know what you're gonna get. It could be a lighter color, white, gold, or something else. I used dark navy cardstock and a clorox bleach pen. It was pretty cool because my cardstock turned purple. I enjoyed this technique and would like to try it some more. I need some stamps that will work with this well, though. You need to have some "space" and detail to the stamp so you can highlight different areas. Art type stamps would work great. The only issue I have is that I'm not sure this technique would be okay in an album. There is some residue left behind and I would worry about it hurting the pictures over time. I think this is strictly an art type technique, although this issue might be avoided if I sealed the image with mod podge or something. Hmmm...more experimenting is needed!
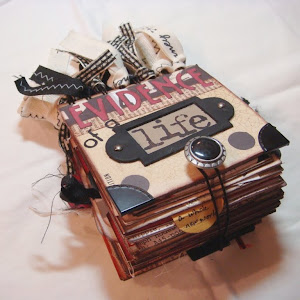
I also did some fun layouts for my Have More Fun class. I have added those images to my photo gallery on Flicker and to my slide show. The 1st project for Have More Fun was a mini-book. I used photos from a road trip my friend Julie and I took last year. It was an easy project and totally fun. I love the final look of the book and am pretty sure I will use this little book design again. It would make a great class for the Crop for a Cure, too! I've posted those pics as well.
I ALSO started a FUN adventure with my "Wreck This Journal" journal. This is part of a challenge from Stacy Julian on the Have More Fun message board. I will talk more about it later. Let's just say it involves paint, destruction, spit, God knows what else, and my bored teenage daughter!!! Fun!
So, I did the next 3 techniques for 52 pick up. I enjoy using paint, so I was thrilled that two of the techniques involved paint. Technique #11 was all about using painter's tape as a resist. I got busy and did so many layers of paint that I had to force myself to stop before Brad had to do an intervention. I used regular acrylic paint and some of the Tim Holtz crackle paint. I didn't have a plan when I started, so I just went with the flow. It was fun. I wanted to leave some chipboard exposed, but I did learn that lo-tac painters tape does stick a little too much to chipboard. Oh well. A little tearing never scared me!
Technique #12 was using glaze pens to doodle a design on top of paint. Basically these pens create a puffy, gel like raised line and can be used on all kinds of surfaces. I actually broke my own rule and did this technique twice. (I'm trying to learn to accept imperfection!) I had to do it twice, because my first try was on a black painted background which I liked better, but the glaze pens didn't show up on it. It was a bummer. They weren't as bright or opaque as I wanted. As it is I had to go over my lines multiple times to make them visible. I like the potential, but I'm not sure the result was as successful as I wanted.
Technique #13 involved embossing a stamped design onto cardstock and then removing the color from the cardstock with the application of bleach. I remember doing this in art school on fabric. It's a cool technique because the dyes disperse and leave different colors behind. You never really know what you're gonna get. It could be a lighter color, white, gold, or something else. I used dark navy cardstock and a clorox bleach pen. It was pretty cool because my cardstock turned purple. I enjoyed this technique and would like to try it some more. I need some stamps that will work with this well, though. You need to have some "space" and detail to the stamp so you can highlight different areas. Art type stamps would work great. The only issue I have is that I'm not sure this technique would be okay in an album. There is some residue left behind and I would worry about it hurting the pictures over time. I think this is strictly an art type technique, although this issue might be avoided if I sealed the image with mod podge or something. Hmmm...more experimenting is needed!
I also did some fun layouts for my Have More Fun class. I have added those images to my photo gallery on Flicker and to my slide show. The 1st project for Have More Fun was a mini-book. I used photos from a road trip my friend Julie and I took last year. It was an easy project and totally fun. I love the final look of the book and am pretty sure I will use this little book design again. It would make a great class for the Crop for a Cure, too! I've posted those pics as well.
I ALSO started a FUN adventure with my "Wreck This Journal" journal. This is part of a challenge from Stacy Julian on the Have More Fun message board. I will talk more about it later. Let's just say it involves paint, destruction, spit, God knows what else, and my bored teenage daughter!!! Fun!
Tuesday, July 8, 2008
Got my mojo back!
Okay, I'm a little more excited about this last technique than I was with the past few. Technique #9 was very cute...just a little tip on how to create your own cupcake flags for birthdays and other celebrations. Nothing big and life altering, just cute. It actually made me sad since my kids are too old to appreciate a cute cupcake flag. (They're 15 and 16 now. Sniff.) I am holding out the hope for a slew of grandkids, so there may be cupcake flags in my future...otherwise Brad better make a big show of appreciating the ones I slap on his dessert!
But technique #10...now that was right up my alley. Basically we created our own paper by taking plain computer printer paper and altering it. Woo hoo!! I likey!!! Of course I could not limit myself to plain white paper. I did use some colored stuff...pink and off white...whatever I had leftover from different printing projects. The technique was to crumple the paper, wipe it with an ink pad to create a tie dyed sort of look and then use the paper to create embellishments. I didn't really like the look of color on white, it was a little to stark and hippie-ish for me. So, after I inked up my paper using multiple coordinating colors of ink, I spritzed the paper with water to make the colors blend. I dried it with my heat gun to speed up the drying (and because I'm a maniacal mister when I get that mini mister in my hands...puddles everywhere!) After that had dried, I went back and used one of my new fave products, glimmer mist from Tattered Angels. That added a little more color and sheen....downright glittery in some spots, but totally cool. More heat, and a coating of mod podge to seal it. I made three sheets of paper to make one 5 x 7 card and had to force myself to stop! But I couldn't finish until I had tried it out on one of my 1000 extra large hang tags. (Yes, that's right...I said 1000. Why, do you need any?) Let's just say I was jonesing for some hang tags so badly last year that I went ahead and ordered a huge package. 1000. Hey, I got a great deal!!! Anyway, I did the same technique to a tag, played around with a stamp set I have, and voila! Technique card #10. I will totally be doing this again. Love taking a plain boring piece of nothing and turning it into something! Plus, I LOVE getting messy!
But technique #10...now that was right up my alley. Basically we created our own paper by taking plain computer printer paper and altering it. Woo hoo!! I likey!!! Of course I could not limit myself to plain white paper. I did use some colored stuff...pink and off white...whatever I had leftover from different printing projects. The technique was to crumple the paper, wipe it with an ink pad to create a tie dyed sort of look and then use the paper to create embellishments. I didn't really like the look of color on white, it was a little to stark and hippie-ish for me. So, after I inked up my paper using multiple coordinating colors of ink, I spritzed the paper with water to make the colors blend. I dried it with my heat gun to speed up the drying (and because I'm a maniacal mister when I get that mini mister in my hands...puddles everywhere!) After that had dried, I went back and used one of my new fave products, glimmer mist from Tattered Angels. That added a little more color and sheen....downright glittery in some spots, but totally cool. More heat, and a coating of mod podge to seal it. I made three sheets of paper to make one 5 x 7 card and had to force myself to stop! But I couldn't finish until I had tried it out on one of my 1000 extra large hang tags. (Yes, that's right...I said 1000. Why, do you need any?) Let's just say I was jonesing for some hang tags so badly last year that I went ahead and ordered a huge package. 1000. Hey, I got a great deal!!! Anyway, I did the same technique to a tag, played around with a stamp set I have, and voila! Technique card #10. I will totally be doing this again. Love taking a plain boring piece of nothing and turning it into something! Plus, I LOVE getting messy!
Sunday, July 6, 2008
You can't love 'em all...
I think my love affair with my 52 pick up class is clearly apparent. But my love affair with all of the techniques has to end somewhere. I knew there would be a few that would not excite me, and here we go. Please note that I am willing to show my duds along with the cool stuff. I hope I get points for this.
Technique #7 wasn't bad, it was fun really...it's just that the results are not much fun to look at. There wasn't really a technique per se, just instructions to play around with a brayer, temporarily affixing things to it so when you rolled it in ink or another medium you could create cool textures, backgrounds, etc. Tena (the teacher) already demonstrated wrapping the roller with rubber bands, mesh netting, masking with the brayer, and bubble wrap. We were challenged to try some new ideas. I made a huge mess in my room! My brayer is pretty big, and (of course!) I decided to start out with black paint...let's just say I have quite a large amount of clean-up ahead of me. I wrapped the brayer with sewing elastic (the kind you would use for a waist band). That was definitely cool. Then I wrapped it with this wide ric-rac that I had. That was cool too, although I think I would like smaller ric-rac...this was too big to make a useful background. Then I used the fuzzy side from a strip of velcro. That just came out looking like a paint roller...and making a huge mess at the same time. Dud. So, I ditched the paint, washed the roller and thought about it. I decided to see what would happen if I rolled the brayer on top of the paper OVER something texturized. Sort of like a rubbing. I lined up a few rows of quarters, put my white paper on top, and rolled with an ink covered brayer. That was definitely interesting. I could explore this technique more. In fact, I consider a technique a good one if it sparks my curiousity to try more things. This one definitely did. Although, I have yet to see how I'd use it on a page. Great for collages though. Hmmm. I think I'm changing my mind on this one. I like it.
Technique #8 was using texture medium mixed with paint, applying it to the card with a plastic knife through a template of your own creation. I made my leaves by cutting them freehand out of cardstock and punched the template out of come thin chipboard. I used black (boring, I know.) Once I had applied the medium I sprinkled the images with pigment powder. I planned on using more colors of pigment, bu the template moved and I had to take it off. That was my big dilemma with this technique. ..how to keep the template in place. I think some temporary adhesive spray is in order. Again, this was fun, but I don't see how I would use it on a page. But, into my deck it goes...who knows, lightning may strike in the future and this will become an all time fave. I'm still having fun, though!
More to come...
Wednesday, July 2, 2008
More fun with the deck...
More fun from my 52 card pick-up class. Technique #5 involved creating my own custom buttons with different supplies from my stash. Of course I couldn't stop with just a few techniques. Once I get mixing up concoctions, I can't stop! It was a lot of fun and I pulled out a lot of supplies I haven't used in ages. I'm not in love with every button I created, but getting there was all the fun. It's like being in Kindergarten and fingerpainting! I was going to arrange my buttons in some cute way and then decided the familiar button card look really can't be beat when it comes to a design statement. I've always believed that if you can't improve on something, then don't even try. Yes, I said it...button cards are pretty darn close to design perfection. 'Nuff said.
Technique #6 was all about using transpaencies. Technically I already did this one on technique card #4, but I do LOVE to PLAY! I have always loved this pic of my Grampa in his studio, working at his easel. It just speaks to me, and not for the obvious reasons...it's so beautiful with the light of inspiration coming through the window behind him and the look of total concentration on his face. I love it. So, here's my technique card. I used some paint on the back of the transparency to emphasize the light and give the mood a little lift. I love the paper in the background: kind of dreamy, Bohemian, and Old World all at the same time somehow. I added some Krylon silver leafing pen to accentuate the chandelier (I love that!!! My Pe-Pop was way ahead of the times! A chandelier in his studio! How cool is that? I think I need to get me one of those!) Anyway, I also added a little caption and a vintage key roughed up with some paint and sanded, a little bling, great fibers, and voila!!! A great technique, and more fun was had by all...well, me, anyway!
Technique #6 was all about using transpaencies. Technically I already did this one on technique card #4, but I do LOVE to PLAY! I have always loved this pic of my Grampa in his studio, working at his easel. It just speaks to me, and not for the obvious reasons...it's so beautiful with the light of inspiration coming through the window behind him and the look of total concentration on his face. I love it. So, here's my technique card. I used some paint on the back of the transparency to emphasize the light and give the mood a little lift. I love the paper in the background: kind of dreamy, Bohemian, and Old World all at the same time somehow. I added some Krylon silver leafing pen to accentuate the chandelier (I love that!!! My Pe-Pop was way ahead of the times! A chandelier in his studio! How cool is that? I think I need to get me one of those!) Anyway, I also added a little caption and a vintage key roughed up with some paint and sanded, a little bling, great fibers, and voila!!! A great technique, and more fun was had by all...well, me, anyway!
Subscribe to:
Comments (Atom)
Evidence of a Life